 |
| Big shield. Big Bazooka. Big thrusters. Big Gundam. (Well, big SD Gundam..) Be afraid. |
But we're not here to talk about the game, we're here for the kit! So jump past the break to check the full details on SD Gundam Physalis' unboxing and review.
I. Unboxing
A. Box
 |
| Front Cover |
 |
| This kit was made in the year 2000. 12 years old. |
 |
| Top Cover |
 |
| A few screenshots of Gundam Physalis in "Stardust Memory". |
 |
| This was sold for ¥800 in Japan. |
 |
| Bottom Cover |
 |
| Sample pictures of the kit's front view, "action" pose, and rear view. |
 |
| Sample pictures of the kit's weapons/accessories and "shooting pose". |
 |
| Left Side Cover |
The bottom half of the box is just plain cardboard. So, enough with the box. Let's open it and see the contents!
B. Contents
 |
| The runners are contained inside 2 plastic bags. |
 |
| Runner C doesn't seem to have a plastic bag. |
 |
| Runner A1: 14 Parts |
 |
| Runner A2: 19 Parts |
 |
| Runner B1: 19 Parts |
 |
| Runner B2: 4 Parts |
 |
| Runner C: 16 Parts |
 |
| Runner PC-111: 34 Parts |
 |
| Seals |
 |
| Construction Manual Front Cover |
 |
| Construction Manual Back Cover |
 |
| Construction Manual Painting Guide |
 |
| Construction Manual "Documentary Photograph" |
 |
| Construction Manual Runner Count & Page 1 |
 |
| Construction Manual Page 2 & 3 |
 |
| Construction Manual Page 4 |
II. Assembly
 |
| Parts are now separated from the runners. |
 |
| Here's the V and crown-thingy on Physalis' head. |
 |
| GUNDAM GP02A PIKACHU!... Sorry. Irrelevant. Looks cool, though. |
 |
| Here's the rest of the head. |
 |
| Connect the 2 parts... |
 |
| Here are the arms. |
 |
| Connect the shoulder pads... |
 |
| Here are the feet... |
 |
| Torso and skirt armor... |
 |
| The thrusters on it's shoulders... |
 |
| Connect the shoulder thrusters to the rest of its parts. |
 |
| Almost half of the parts from PC-111 are not used. |
 |
| Don't forget the accessories! |
III. Review
A. Basic Profile
Before we go to articulation and check the unique features of the kit, I bet you'd like to check some basic profile pictures of the kit first! Let's take a look, then.
 |
| Front View |
 |
| Rear View |
 |
| Side View |
 |
| Height Measurement |
 |
| GP02A wants to get close and personal with you using its Beam Saber. |
 |
| You go... KABOOM! |
B. Articulation, Detail & Gimmicks
Now, let's take a closer look at the SD kit itself, while checking articulation and the kit's gimmicks as well. I'll let the pictures speak for themselves and just type in some captions here and there. I was planning on converting the pictures into animated GIFs but, unfortunately, Google Drive doesn't give unlimited space to animated GIFs.. Bummer. But I guess it's ok, since it also shrinks the picture, taking away some of the detail. So, let's stick with good ol' static pictures. Yay!
 |
| Due to the bazooka part attached to the back of its right shoulder, SD Gundam Physalis tilts slightly to its right. |
 |
| Let's take a closer look at it's head. It has a unique design when compared to others with "generic" Gundam faces. |
 |
| The head can rotate 360°. "Hello, backpack!" |
 |
| The head can tilt VERY slightly upward... |
 |
| ...and down. BARELY noticable. |
 |
| Feet can only go sideways. Using its left foot as reference, it can go this far to its left... |
 |
| Then this far inwards. |
 |
| The bottom of the feet are detailed as well, just in case you'd like to display this mounted on an Action Base. Neat! |
 |
| Now, to the more articulated parts of the kit, the arms. Of course, it can rotate from the shoulder at 360°. But you'll have a hard time rotating it due to the thrusters attached to the shoulder pads. Let's remove that for a moment. |
 |
| The arm (from the shoulders) can move this far forward... |
 |
| This far backwards... |
 |
| This far upwards... |
 |
| And this far downward. |
 |
| Now, the arms' articulation from the shoulder pads. Very limited, mind you. |
 |
| It can go this far outwards... |
 |
| Then this far forward. Again, barely noticable. |
 |
| The wrist doesn't rotate. However... |
 |
| You can tilt it slightly downward. This is specifically made so that it can hold the bazooka properly. |
 |
| You can also tilt the bazooka part's holder at the back of Physalis' right shoulder. But only upward and downward. |
 |
| Slowly move it upward... |
 |
| Done. Then, attach the other half of the bazooka... But we'll get to that later. |
 |
| The actual bazooka, however, can rotate 360°from where it's attached. |
 |
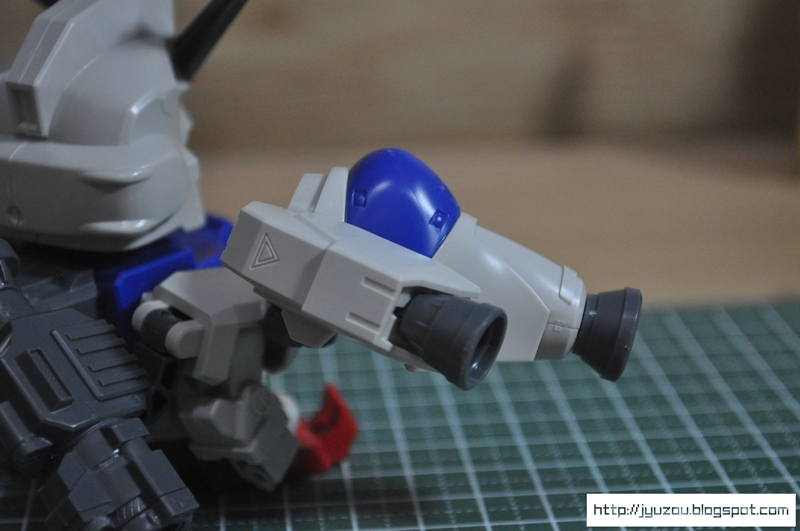
| Moving forward to the most articulated part of the kit, its shoulder thruster thingamajig. It's attached to the shoulder pad via pegs and it can rotate 360° from there. |
 |
| Let's move it towards the camera... |
 |
| Continue to move it upward... |
 |
| Continue to move it downward until you reach its initial position. 360°! |
 |
| The left shoulder thrusters on my kit are somewhat loose.. So let's switch shoulders. You can tilt the thrusters upward. You can also tilt towards yourself after tilting it upward. |
 |
| It can go this far using just one of the pegs. It has double pegs, by the way. |
 |
| Looking at the back side, there's a seperate outside thruster. |
 |
| Attached to a peg, you can also rotate it up to 360° from where it's attached. |
 |
| Looking at the bottom part of the shoulder thrusters, you'll notice that there is a hidden thruster in there. |
 |
| This is actually the gimmick of the kit. Now, using the thruster at the bottom... |
 |
| ...you can tilt them both... |
 |
| ...this far. |
 |
| And, look. The hidden thruster is tilted as well! Neat! |
C. Accessories
Accessories makes the kit look cooler! This kit has 3 accessories. A giant bazooka, a giant shield (a REALLY giant shield) and a... not so giant beam saber, just in case its bazooka runs out of ammo. Ha!
 |
| First, the shield! The GIANT SHIELD! It actually has a sort of gimmick, as well. |
 |
| This is where the other half of the bazooka is stored. Let's remove that for a moment.. (It's hard to remove, by the way.) |
 |
| Done! Then, all you have to do is... |
 |
| ...close it back down. |
 |
| Getting back to that bazooka, let's attach it to the other half that's attached to Gundam Physalis' back. |
 |
| Looking at the bottom part, we can see how it's attached to the peg at the back of Gundam Physalis' right shoulder. |
 |
| This is how the complete bazooka attaches. Notice how wrists tilt to make it look like it's holding the bazooka, when it's placed on top of the wrist. |
 |
| Now, for the Beam Saber, we need to get it from its hip. |
 |
| Here's the Beam Saber and its blade. They don't give you a clear piece for the blade, unfortunately. |
 |
| Then, this is what it looks like when connected together. Note that you have to insert the Beam Saber first to the kit's wrist from the bottom before connecting the actual blade in order for you to get Gundam Physalis to hold this. |
IV. Final Thoughts
SD Gundam Physalis is one of the coolest SDs that I've bought! The first Gundam with cool gimmicks that I've bought is my SD Wing Gundam Zero. And although I don't think the gimmicks and the quality of this SD kit is superior to my SD Wing Gundam Zero from before, that doesn't mean that this is crap. The shoulder thrusters are definitely the most interesting part of the kit. Although the kit's overall articulation is pretty much standard compared to other average SD kits from it's time (and even today), You can place it in more dynamic poses due to the great articulation of the shoulder thruster thingamajigs. However, since the bottom part of the bazooka is attached to SD Gundam Physalis' right shoulder, positioning of the weapon is very limited. There are other things that make the kit very interesting as well. I love the Gundam's unique, bulky and tank-like mecha design, and other subtle details like being able to store the other half of the bazooka at the back of the shield.
No doubt about it. This kit is great! Especially when you think about how cheap this kit is.
 |
| SD Gundam Physalis doesn't need to do a dynamic pose! It'll let its weapons do the talking. |
Thank you for reading another one of my Gunpla reviews! There will be more in the future, so stay tuned! That took me longer than I thought.. Whew!
...and I'll see you in the next post!
No comments:
Post a Comment