 |
| It's a Gundam. And it's Super. Hah! |
Today, we're going to take a look at "SD Super Gundam"! Jump past the break to check the full details.
I. Unboxing
A. Box
 |
| Front View |
 |
| This kit was made in the year 2001. Very old kit, I know. |
 |
| Top Cover |
 |
| More information about Super Gundam and its specifications and weapons. |
 |
| More Japanese texts. And some warnings. I can't read it... |
 |
| Top Cover |
 |
| Sample pictures of SD Super Gundam's front view, rear view, and the "cockpit capsule". |
 |
| The G-Defenser. We'll talk about the picture to the very right later. |
 |
| Right Side Cover |
 |
| Left Side Cover with shop's price tag. |
The bottom half of the box, where the contents are stored, is just plain cardboard. Time to open the box and see what's inside!
B. Contents
 |
| Time to open the plastic bags. |
 |
| Runner A1: 16 Parts |
 |
| Runner A2: 20 Parts |
 |
| Runner C: 11 Parts |
 |
| Runner D: 13 Parts |
 |
| Runner PC-123: 27 Parts |
 |
| Seals |
 |
| Construction Manual Front Cover |
 |
| Construction Manual Back Cover |
 |
| Construction Manual Painting Guide |
 |
| Construction Manual "Documentary Photograph" |
 |
| Construction Manual Runner Count & Page 1 |
 |
| Construction Manual Page 2 & 3 |
 |
| Construction Manual Page 4 |
II. Assembly
 |
| Parts are separated using the side cutters. Lots of nub marks... *Sigh* |
 |
| Let's start with the main unit, SD Gundam Mk-II. Here's the head. |
 |
| Here's the hip part/skirt armor... |
 |
| Shoulder pads... |
 |
| The arms... |
 |
| The torso has a lot of parts. |
 |
| Connect these parts to the frame... |
 |
| Very detailed torso. |
 |
| The feet looks fine... |
 |
| The last part are the thrusters. |
 |
| Next, the G-Defenser. Here are the "Pontoons". I think they're some sort of missile launcher? |
 |
| And the main body of the G-Defenser. We just need to add a few more parts... |
 |
| ...and here you go. The G-Defenser's wings. |
 |
| Of course, there's also the G-Defenser's cockpit. |
 |
| The remaining parts from Runner PC-123. |
 |
| SUPER PIKACHU GUNDAM!! ...sorry, I can't help myself. |
III. Review
A. Basic Profile
Here are some basic pictures of the 2 units before we move forward to articulation and features. The 2 units that make up SD Super Gundam are: SD Gundam Mk-II as the main unit and a Mobile Armor, G-Defenser, as a sort of booster for the Mobile Suit.
First, pictures of the main unit: RX-178 SD Gundam Mk-II.
 |
| SD Gundam Mk-II Front View |
 |
| SD Gundam Mk-II Rear View |
 |
| SD Gundam Mk-II Side View |
 |
| SD Gundam Mk-II Height Measurement |
 |
| SD G-Defenser Front View |
 |
| SD G-Defenser Rear View |
 |
| SD G-Defenser Side View |
 |
| SD G-Flighyer Front View |
 |
| SD G-Flighyer Rear View |
 |
| SD G-Flighyer Side View |
 |
| SD G-Flighyer Height Measurement |
 |
| SD Super Gundam Front View |
 |
| SD Super Gundam Rear View |
 |
| SD Super Gundam Side View |
 |
| SD Super Gundam Height Measurement |
 |
| Super Gundam mad! *Sigh* That was lame... |
 |
| The target is you. It's already locked on. I also noticed that I forgot to remove the Cockpit Capsule... Darn. |
B. Articulation, Detail and Gimmicks
Now, let's take a closer look at the separate units' features. As usual, pictures speak louder than words, although they don't speak. Hah! Enough corny jokes, let's do this.
First, RX-178 SD Gundam Mk-II:
 |
| Closer look at Gundam Mk-II. |
 |
| The head can be tilted this far upwards. |
 |
| ...and this far downward. |
 |
| The head can be rotated almost at 360°, but the chin hits the backpack. |
 |
| Now, for the arms. Great articulation here. |
 |
| Shoulder pads are connected via pegs and can rotate 360°. |
 |
| The arms are connected to the shoulder pads and can go outward this far. |
 |
| ...and this far when spread this way. |
 |
| There's articulation in the elbows as well. You can rotate the arms from the elbow 360°. |
 |
| 360°. From the elbow. 360°. Spin that around... |
 |
| You can also fold the arms from the elbows. |
 |
| Folds up to this far. |
 |
| The wrist can rotate as well. 360°. |
 |
| Closer look at the torse here. |
 |
| Suprisingly, there's a cockpit hatch gimmick here. Wow. |
 |
| The torso is connected via a peg and can rotate. |
 |
| But only this far due to the skirt armor. But if you lift the torso a bit, I guess you can rotate it 360°. |
 |
| Let's look at the feet. It can go this far out (using the right foot as reference) and this far inward (using the left foot as reference) but in this position, it wil tilt in an awkward position. |
 |
| Most of the SD kits that I've seen has hollow feet. It's good to see that they put some effort here. (But that's most likely because of the G-Flighyer transformation.) |
 |
| Here are the thrusters. It's on a ball joint, so you can wiggle and rotate it. (The things that are attached to the backpack, that is. Those are thrusters as well.) |
 |
| Shift it to the left... |
 |
| Pull it towards you... |
 |
| Push it forward... |
 |
| ...and rotate it. 360°. |
 |
| Now, counter-clockwise. |
 |
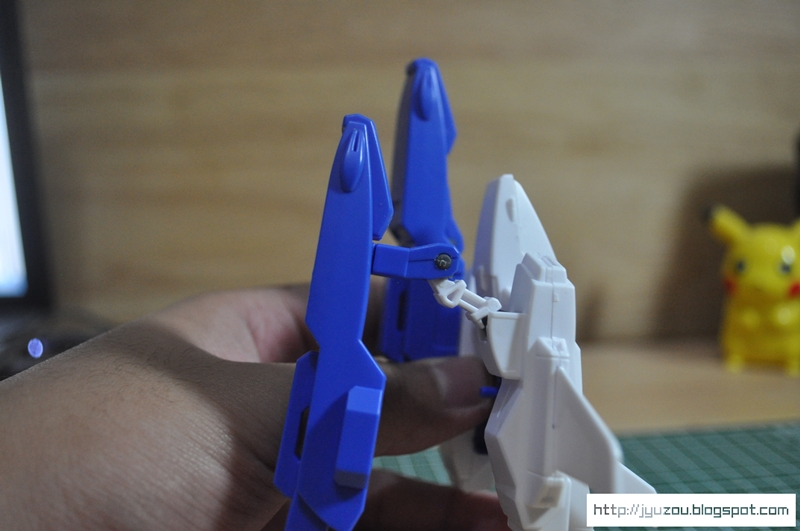
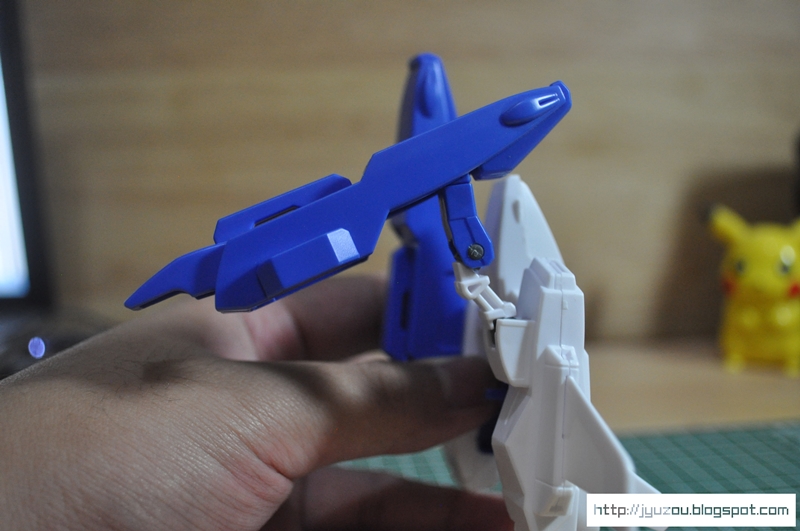
| The G-Defenser is connected to the backpack via a peg. Notice that small piece of plastic at the middle... |
 |
| Pull that out to reveal the hole where you'd insert the peg from the SD G-Defenser. |
 |
| The G-Defenser, without the Long Rifle and the "Cockpit Capsule". |
 |
| Here's the Cockpit Capsule. |
 |
| Attaches via a peg. It can rotate 360°. But I don't think the G-Defenser does that in the Anime. |
 |
| Here's a view of the bottom part. There are lots of nub marks... |
 |
| From the "Pontoon", you can tilt the Pontoon itself upwards and downards. |
 |
| ...this far up from that point. |
 |
| Articulation from the middle joint, between the joint in the Pontoon and the joint on the G-Defenser itself. From this point... |
 |
| ...tilt it some more... |
 |
| ...up to this point. Well, you can tilt it some more, actually. |
 |
| It can also rotate from that point as well. |
 |
| While the joint on the G-Defenser itself can only tilt up and down at 90°. |
 |
| There are also fins for the "Cockpit Capsule" so you can display it as some sort of Core Fighter since you have to remove it to make the SD Super Gundam transformation. |
C. Accessories
Or just 'accessory'. SD Super Gundam only has one accessory/weapon and that's the G-Defenser's Long Rifle because SD Gundam Mk-II doesn't come with its basic armaments.
 |
| The Long Rifle. The only weapon/accessory available in this kit. |
IV. Final Thoughts
Again, this is a great Super Deformed kit. Buying this is like literally buying 2 SD kits. Good quality, Superb articulation, and lots of transformation gimmicks. It's a shame that the SD Gundam Mk-II doesn't come with any of its basic armaments, but that's ok since this is supposed to be all about the SD Super Gundam. However, it only has 1 accessory and I'm quite disappointed that the Long Rifle is hollow on one side. It was also quite difficult to get the SD Gundam Mk-II to hold the Long Rifle. The peg was too small for its hand, for some reason. But that can easily be remedied by a piece of small paper.
For just ₱480, this is a good deal. This is a great kit and I'm looking forward to purchasing with the same quality from the G Generation line, if there are still some available. I think they're pretty rare now.
 |
| Coolest pose that I can do. (Yeah, I forgot to remove the Cockpit Capsule.) |
Thanks for reading my Gunpla Review! Hopefully, there should be more Gunpla-Related posts this month, so stay tuned! And I'll see you in the next post!
No comments:
Post a Comment